
Written by Mike, based on course content from ADK
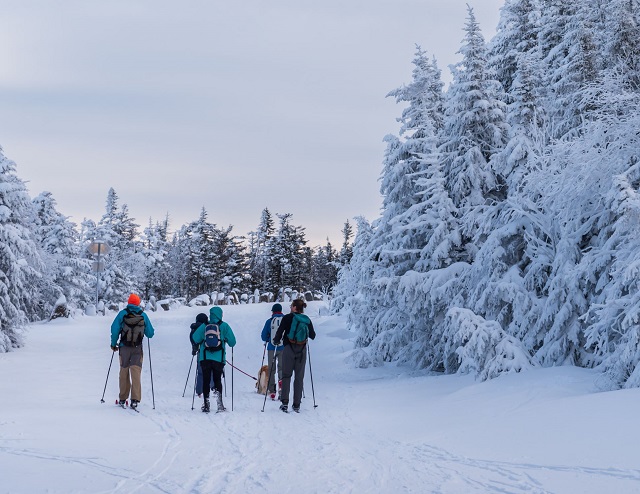
The sights from the Adirondack summits are spectacular in winter! The fire towers encrusted in frost and ice against the bright blue sky, spruce trees completely flocked in a layer of snow, and the views of the surrounding peaks seem to go on forever … at least that’s what it looks like to me as I sit in my home office paging through pictures posted by hikers on the “Adirondack Trail Conditions” Facebook group as another conference call drones on from my phone. “It’s time to stop daydreaming about hiking an Adirondack peak in the winter and to start planning a beginner hike”, I tell myself. But what exactly does one need to hike safely in the Adirondack winter?
A quick search brought me to ADK.org, the website for the Adirondack Mountain Club where I found their online workshops. The description for the Winter Survival 101 workshop quickly convinced me to register
“Join us from the comforts of your own home as we cover the essential winter survival skills: backcountry preparedness, snowshoeing basics, an introduction to map & compass navigation, shelter-building, avalanche awareness, fire-building, and water procurement. We’ll also cover cold-weather injuries & illnesses, Leave No Trace backcountry skills & ethics for winter, and more!”
ADK Winter Survival 101 Online Workshop Description
The workshop, conducted in a Zoom meeting, could not have been any more convenient! Our instructor and host, Tyler, did a wonderful job covering the topics in an informative and engaging manner, frequently answering questions from the dozen or so participants over the four hour session. This wasn’t just somebody reading from a lesson plan … Tyler clearly had a wealth of experience on the topic and walked us through his own gear to help us understand the necessary equipment for a well prepared winter hike.
So, what did I take away from the workshop? Here are the top five things I learned about Winter hiking preparedness and survival:
1.Plan ahead and prepare
Start your planning by looking at the expected weather during your hike, as well as the days immediately before it. A stretch of warmer weather ahead of your hike may weaken ice and make water crossings more challenging, while a recent major snowfall may slow your expected speed on the trails. If your destination is one of the peaks, www.mountain-forecast.com provides weather forecasts for the summit, where altitude and wind will always make for much colder conditions than you might see in a local area forecast.
While researching the weather, make note of the times for sunrise and sunset. Especially when just learning the ropes of winter hiking, one should try to avoid planning a hike that will last longer than the daylight hours as obstacles and trail conditions become even harder to recognize with only the light of a headlamp. As a good practice, set a “turnaround time” for your itinerary so that you plan to return by sunset. This is the midpoint of your available daylight. For example, if sunrise is at 6:00AM and sunset is at 5PM, you have 11 hours of daylight. Assuming you hit the trail at sunrise, your turnaround time would be 11:30AM.
Next, make yourself aware of the Rules and Regulations in the area you are planning to hike. In the Adirondacks you can visit the NY Department of Environmental Conservation Adirondack Backcountry Information page to find a wealth of information, rules, and additional resources. One very important rule to be familiar with in the Adirondack High Peaks Wilderness is that snowshoes or skis are required where snow has accumulated to a depth of 8 inches or more. Bare-booted hiking in these conditions results in leaving “post holes” (the deep depressions your boot leaves in the deep snow) in the snowpack. Not only is post-holing a trail poor etiquette, as it makes the journey more difficult for those who follow, but it also can be dangerous for skiers and other hikers, especially if the holes freeze over.
Once you have your destination and route determined, you should leave a simple itinerary with a family member or friend so someone is aware of where you are headed and the route you plan to take. Include your destination, route, timeline, and who will be with you.This may seem dramatic as we have all become accustomed to being able to simply pull out a cell phone when we need to reach someone, but that’s a bad strategy in the wilderness. Your cell phone battery drains quickly in cold weather and you can’t bet on having coverage, so if things were to go wrong your best bet is to have someone expecting you and able to call for assistance if you don’t return as planned.
Finally, determine the clothing, equipment, and food you will need for your hike.
2. Layers of clothing are key to cold weather hiking
Before getting into any discussion of specific clothing items needed, one must first understand the goal of proper winter layering. You remember that antiperspirant commercial that said, “Never let them see you sweat”? That’s the name of the game when spending hours hiking in the winter. The science is simple … sweat makes clothes damp, damp clothes don’t insulate as well, and the end result is you get cold. By wearing a number of layers, one can easily adjust the level of insulation to adapt to the weather and activity level throughout a hike to prevent excessive sweating.
The first rule of a good layering strategy is NO COTTON garments. Cotton readily absorbs moisture, so when you sweat it soaks it up like a sponge and keeps it next to your skin. It also takes a long time to dry so you stay damp, which means your layer is no longer providing you any insulation. Over time in cold conditions this can lead to hypothermia, which we’ll talk about later.
Your clothing should consist of the following layers for your torso:
- Base layer to wick perspiration away from your skin. The best materials for your base layer are merino wool and synthetics.
- Insulating layer for warmth. This can be made up of a number of items ranging from a long sleeve shirt to fleece or down jackets.
- Wind/rain layer to protect against the elements. For wind a typical ski jacket shell will do just fine, but a good rain jacket is a must for very wet conditions.
Everyone’s body is different so you need to figure out what works best for you. The best layers are those that can be taken off or added easily while on the trail so that you can constantly adjust to prevent sweating. For longer hikes you should also bring a few extra, dry items just to be prepared in case something gets wet.
Beyond covering your torso, the following items are essential to completing your winter hiking ensemble:
- Wool or fleece cap for your head, and ideally able to be pulled down over your ears.
- Neck gaiter to cover exposed skin on the neck and able to be pulled over the face if needed.
- Gloves or mittens. Personal preference really comes into play here depending on whether your hands stay naturally warm or cold. Again, some choose layers starting with merino wool or fleece liners and then add a shell glove or mitten. In any case, a spare set of gloves is a smart packing choice as who hasn’t ended up with damp sweaty gloves after skiing or playing in the snow?
- Winter hiking pants. Not heavy snow pants … remember, you want convenient layers. You really can’t really just whip your pants off if you start getting too hot.
- Socks. Again, merino wool or synthetics are the way to go to wick the perspiration away from your skin. Usually one sock is fine if you have good insulated boots.
- Boots. A good pair of insulated winter boots that provide good ankle support will serve you well on the uneven and shifting footing of snow covered trails.
- Gaiters. Gaiters are sleeves of rugged and usually waterproof material that wrap around the lower leg and cover the upper boot to keep snow and debris out of your boots.
- Traction devices. Depending on the trail conditions you may need microspikes, crampons, snowshoes, or a combination of these at various points in a climb. Tyler advised he keeps microspikes in his pack from September through June as you may still encounter ice on the High Peaks in the early summer and early fall.
I recommend you view this ADK video for additional information on how to actively manage your layers during a hike.
3. Cold weather considerations for your pack
If you’ve been out day hiking in warmer weather, you’re already familiar with the essential items you need to have in your pack, however the cold weather requires some extra gear and special considerations to be taken when assembling your pack. As a result you’ll likely need a slightly larger capacity pack for winter hiking. As a reference, Tyler stated that he uses a 40 liter pack on winter day hikes, but will go up to a 60 liter pack if he’s guiding a group in order to carry sleeping gear for emergency use.
Precautions must be taken to prevent your water from freezing. A camelbak or other water bladder device will typically be rendered useless by water quickly freezing in the dispensing tubing. An uninsulated water bottle will also develop a layer of ice rather quickly, although this can be delayed by initially filling the bottle with hot water. Other solutions include putting water bottles in a thermal sleeve (or even an old sock), or putting a very securely closed bottle inside your pack where it is better insulated. If you have a thermos bottle, carrying a hot beverage like tea, coffee, or hot chocolate is a great treat midway through a long hike and provides heat to your body to fight off the cold.
Similarly, you need to consider the cold weather tolerance of your food and snacks. You want to keep your food easily available as continuously eating and drinking along the way will keep feeding your inner furnace providing you warmth and staying well hydrated. Candy bars should be avoided unless you eat them quickly as they freeze easily (ever put a Snickers bar in the freezer?). Items like nuts, seeds, and granola are excellent snacks as they pack easily, don’t freeze, and have a high energy density.
Other than food and water one should always have the usual essentials such as a map and compass for navigation, waterproof matches or lighter, flashlight and/or headlamp, first aid supplies, and a good knife. In addition to these items Tyler recommended some cold weather supplements such as hand warmers (which can also be applied to the neck or body for warmth), a pack cover (to keep your pack dry in rainy or wet conditions), googles (for visibility in wind blown snow conditions), mittens, and 2 bread bags (if the inside of your boots get wet, put on dry socks and pull the bags over them to keep your feet dry. But your day hiking is done so get back to the trailhead). One should also consider bringing a small stove kit with a burner, pot, spoon, and fuel.
As always, have a bathroom kit on your pack (hand sanitizer, paper, trowel, zip lock bag). The peaks are experiencing record levels of use and improper disposal of waste is becoming a huge problem. Be prepared to do your part, even in the cold. Check out this video from ADK to get a little more advice on how to take care of business during the winter.
As part of your layering strategy, bring some dry items in a clothing bag. Items to consider are a spare insulating layer such as a fleece top or down jacket, a pair of dry socks, and a windbreaker or ski jacket shell (note, less breathable outer layers are best to be worn when not actively hiking, such as during a break or enjoying the summit as they get sweaty). An underlayer pant is also an option, but again as pants are not easily changed on the trail, these would be carried as an emergency item incase of an unplanned overnight camp.
Sleeping gear can be added to your pack, but unless you are planning to camp as part of your itinerary, it’s reserved for emergency use only. A bag, insulated sleeping pad, and bivy or tarp will provide you warmth and shelter if an overnight stay becomes necessary or if treating someone in the party for hypothermia. Again, more on that later. On a shorter hike, a mylar space blanket is great alternative for such contingencies and takes up very little space/weight
The last item is simply a bag liner to add one more barrier so your gear stays dry. While liners can be purchased, a heavy plastic trash bag will do the job nicely.
4. Be aware of winter hiking hazards
A huge part of the allure of getting out into the wilderness during the winter is to be alone in nature, but like anything, it’s not without its risks. Nevertheless, awareness and some basic preparation can make a big impact on mitigating the risk posed by these situations. Also, I didn’t state this in the planning and preparation section but don’t hike alone in the winter. A party of three or more is ideal so that, in the event a member of the party is unable to carry on, one person can stay with them and at least one other can go back to get help. Just having someone else with you lowers the risk of the following hazards.
Water crossings
Crossing a stream or creek may be needed in order to reach your destination at any time of year, but icy rocks or a seemingly solid sheet of ice deserve heightened attention to the task. When crossing water:
- Always unbuckle your pack first, at both the chest and belt, so you can get out out of it quickly if needed
- As a thumb rule, 2” ice supports one person on foot; 3” can support a group in single file.
If when crossing ice you break through, immediately:
- Get out of you pack
- Turn around toward the direction from where you came (the only ice you know is solid is that which you were walking on)
- Pull yourself out onto the ice staying flat and spreading your weight out. (Ice safety picks or the ends of hiking poles can be used to get better grip when pulling oneself up onto the ice.)
- Crawl back to safe ice or land and
- Change into dry layers
Spruce traps
This was a hazard I had never heard of before! As snow falls and accumulates on the branches of spruce trees and other evergreens, the branches droop under the weight, but keep the snow lifted up creating a void beneath the branches. If you leave the trail to bushwhack or tend to other business and step near a trunk your weight collapses the branches into the void dropping you suddenly into what may be very deep snow.
If you do find yourself in this situation, it usually just requires several minutes of digging oneself out of the snow, and maybe freeing a stuck snowshoe from the branches beneath.
Avalanches
Although rather rare, avalanches do occur in the High Peaks. The key to avoiding this hazard is to recognize the conditions and terrain that make an avalanche more likely to occur.
Avalanches occur where large, open sheets of snow build up on sloped terrain. Therefore, any of the open scars on mountainsides where rockslides have occurred are prime territory for avalanches. As snow accumulates throughout the season it settles and forms layers. Certain conditions can cause the top layer to slide off of the layer beneath resulting in an avalanche. Consider the following if you will be in an area where avalanches may occur:
- A recent heavy snowfall may increase the risk of an avalanche
- If you must hike through a slide area, stay on the sides of the slide so you might escape into the woods in the event an avalanche occurs
- Recognize if you are hiking a trail that passes below a slide as this also places you in the path of an avalanche
- Up on ridgelines, wind can drift snow into overhanging cornices. If a hiker treads upon these they can break loose, or can break loose on their own, and trigger an avalanche
Weather above the treeline
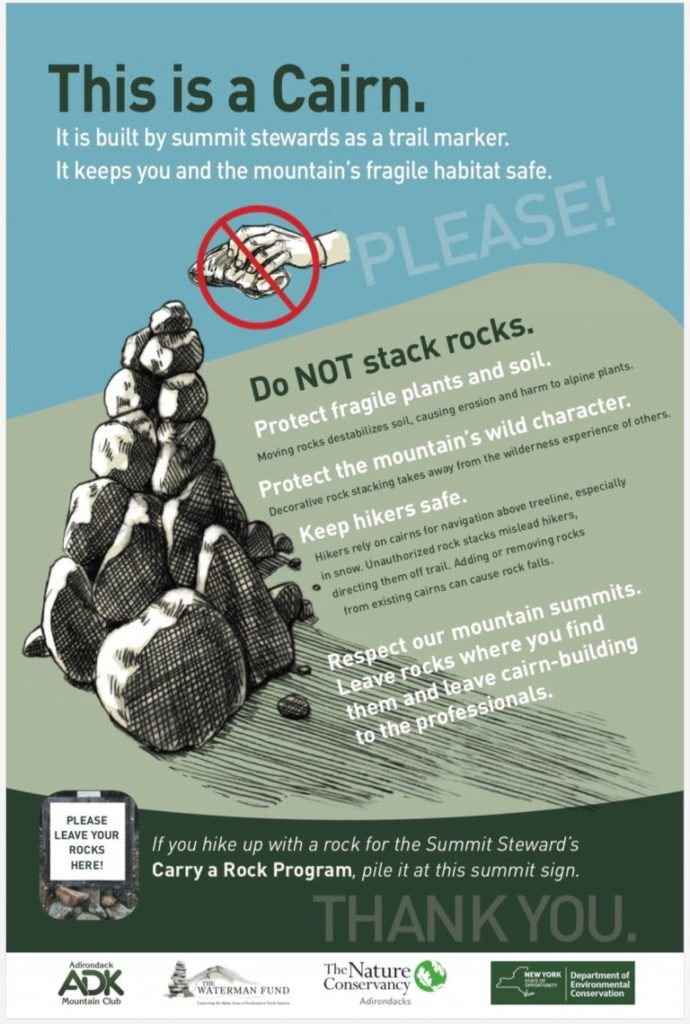
Once above the treeline, you are much more exposed to the elements. Rock ledges and exposed surfaces may be scoured by the wind leaving only ice which requires the use of microspikes or crampons for traction. Wind can whip up snow into a blinding whiteout and wind chills can significantly intensify the effect of the cold on exposed skin. In addition to having the proper equipment for these situations, always be aware of the path back to the trail if you must retreat to the relative safety of the tree cover. Cairns, the small stacked stone markers on many peaks are navigation markers, not decorations. A line from cairn to cairn leads the hiker back toward the trailhead.
5. Know how to recognize and treat cold related illnesses
Even with the proper preparation, clothing, and equipment it is important that a hiker be continuously vigilant of the effect of the cold on their body. Cold related illnesses are progressive, meaning that if not addressed they will continue to worsen over time.
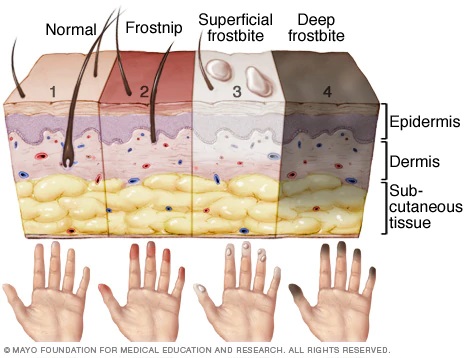
Frost nip occurs when the first layer of the skin begins to freeze. The affected area will have a “pins and needles” feeling. The area should be immediately covered with a dry layer of insulating material, such as pulling a neck gaiter up over exposed cheeks or nose, or a cap down over exposed ears.
Frostbite is the next step in the progression and can be superficial or deep as freezing of the layers of the skin moves deeper in the flesh. In response the body begins to limit blood flow to the affected area or extremity, in effect sacrificing it, in order to preserve the body’s core temperature. Frostbitten areas will become bluish or black. The immediate treatment is to remove any wet layers on the area and replace them with dry, warm layers. The application of warmers is also recommended.
Hypothermia is the condition in which the body can no longer maintain its core temperature. Note, a person does not need to have suffered frostbite to develop hypothermia. It develops from prolonged exposure to the cold environment causing your body to lose heat faster than it can generate it. Some of the symptoms of hypothermia are:
- A loss of dexterity (The “umbles” as Tyler put it … mumbling, fumbling, tumbling)
- Shivering
- Pale, cool skin
- A change in mental status
- Exhaustion
- Loss of consciousness
Hypothermia is a life threatening condition that requires immediate medical treatment. Remove any wet layers and apply warm dry layers and warmers. Get out of the elements if possible and if waiting for rescue place the affected person in a space blanket, sleeping bag, and bivy or other shelter (recall Tyler discussed carrying this sleeping equipment for just this situation). Have the person try to squeeze their fingers and toes to generate warmth, and if they are conscious feed them sugary foods and warm liquids to help their body generate heat.
It’s amazing how a little knowledge can fuel your confidence and enthusiasm! One should note that this online workshop is presented in the context of winter hiking in the High Peaks, and while that’s the goal for me it certainly isn’t where I’ll get started. Tyler made it clear at the start of the session, there is a big difference between knowledge and experience. Anyone getting started in winter hiking should set their sights on some of the shorter, more accessible mountains. It’s far safer to tweak your layering and packing skills on a beginner peak before venturing deeper into the wilderness.
As for me, after completing the Winter Survival 101 workshop I immediately took stock of my gear and I’ve spent the last few weeks filling in the big gaps like getting a really comfortable pair of insulated hiking boots and tracking down a pair of snowshoes to borrow from a friend (not surprisingly, most places are sold out of good mountaineering snowshoes in the middle of the winter). I see snow is in the forecast and thanks to Tyler and the Adirondack Mountain Club I’m ready to make tracks (remember … no post holes!)
“Thank You” to Adirondack Mountain Club!
We want to thank ADK for supporting us in writing this article about their online workshop! Be sure to go to their website and explore the wealth of information available and consider a membership to their organization.
I think this is one of the most vital info for me. And i am glad reading your article.
But wanna remark on few general things, The site style is perfect,
the articles is really nice : D. Good job, cheers
Thank you and happy hiking!